Documentation Take Bio
What is Take Bio?
A single website to help you share all the work you create, curate, and sell using Blogger templates. Learn more about Linkfree here and in upcoming articles!
Getting Started with Blogger Templates
Change Currency Templates
Update your Biolink avatar to make your page standout.
Login to your Blogger dashboard.
Go the Settings Layout.
Click on the "(Currency Theme)" button
-
Enter your preferred currency code:
- IDR - Indonesian Rupiah
- USD - United States Dollar
- EUR - Euro
- GBP - British Pound
- JPY - Japanese Yen
- AUD - Australian Dollar
- CAD - Canadian Dollar
- SGD - Singapore Dollar
- MYR - Malaysian Ringgit
Click .
Change WhatsApp Account
Update your WhatsApp Account to make your page standout.
Login to your Blogger dashboard.
Go the Settings Layout.
Click on the "(WhatsApp Account)" button
Enter your WhatsApp number, for example: +62 85282424331
Click .
Change Payment Account Data
Update your payment account information to receive payments through the payment methods available in your store.
Log in to your Blogger Dashboard.
Go to Layout.
Find the Payment Settings widget and click the Edit button.
-
Update the payment account information according to the payment method you want to use:
- Bank Account - Enter your bank account details.
- Wallet Account - Enter your supported digital wallet details.
- QRIS - Add your QRIS payment information.
- PayPal - Enter your PayPal account information.
- Crypto - Enter your cryptocurrency wallet address.
Click Save to apply the changes.
Change Profile Background or Avatar

Update your Biolink avatar to make your page standout.
Login to your Blogger dashboard.
Go the Settings Layout.
Click on the "(Header)" button
Add title name or bussines name profile
Add description title
Upload a photo from your device or URL.
Click .
Setting Widget Social Icon
Open Blogger > Layout > Add social icons
- Name > Text name social media > ex:
facebookIcon Available :
facebook|twitter|linkedin|youtube|instagram|whatsapp|tiktok|tumblr|github|dribbble|soundcloud|behance|tiktok|pinterest|discord|delicious|codepen|email - URL > Your URL social media account
Change Background Theme
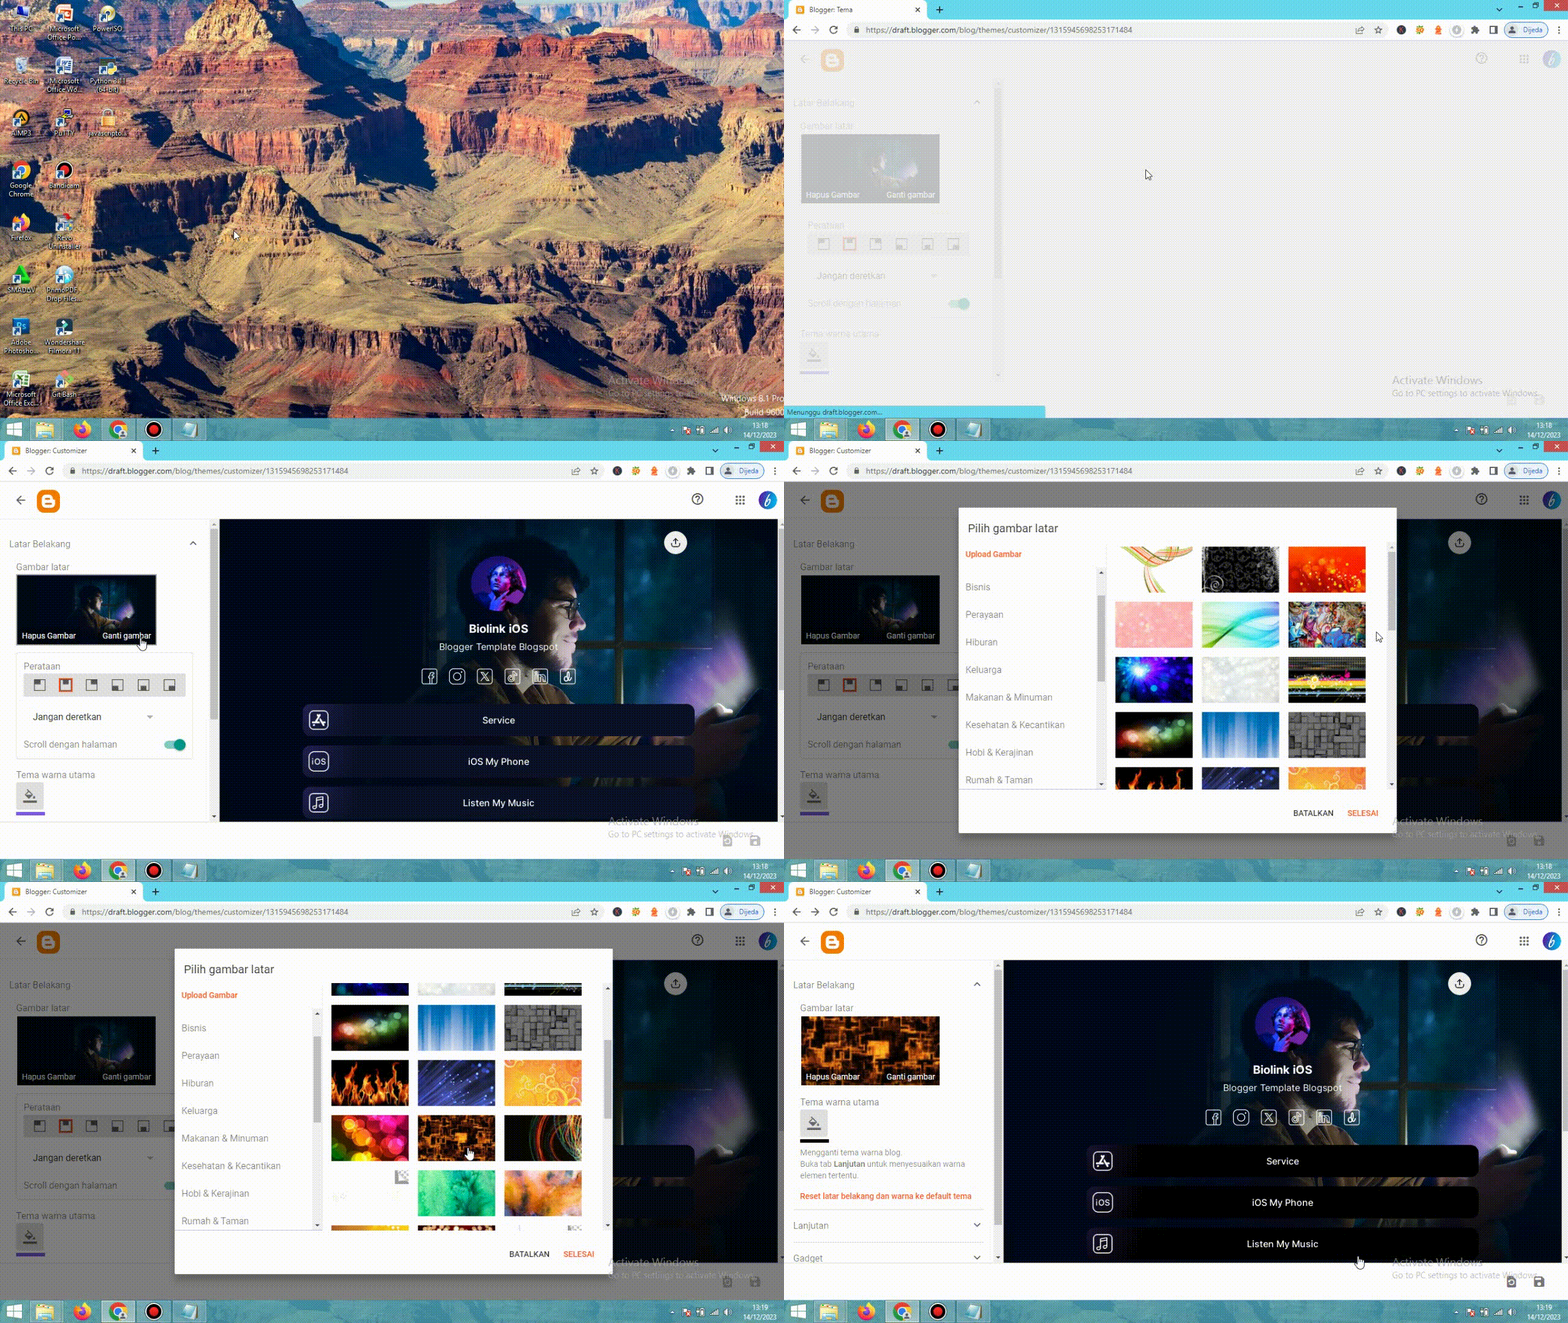
Chose your background and color theme.
Login to your Blogger dashboard.
Go the Settings Theme.
Click on the "(Customise)" button
Click on the "Background" button
Change image for Background or Click Main colour theme for Color theme
Click .
Change Color Theme

Customize the theme colors as you like.
Login to your Blogger dashboard.
Go the Settings Theme.
Click on the "(Customise)" button
Click on the "Advanced > Background" button
Change color for Theme or Font style for Font theme
Click .
Add Link Bio
Remove or Add a new link in your bio.
Login to your Blogger dashboard.
Go the Settings Layout.
Click on the "Add Link" click button
Chose widget Image for Link with Thumbnail

Chose widget Link list for Link no Thumbnail

Click .
Add Button Contact Form
Login to your Blogger dashboard.
Go the Settings Layout.
Click Link Widget > Add Widget > Contact Form Click
This contact form is a default from Blogger. If you want to change it to a WhatsApp form, the title column must be filled with the words "WhatsApp".
Click on the title column section and write the text with "WhatsApp" and Save.
Set the WhatsApp number in the Widget Setting Theme > In the column, replace it with your WhatsApp number according to your country code.
Click .
Add Button iframe Spotify
Login to your Blogger dashboard.
Go the Settings Layout.
Click Link Widget > Add Widget > type HTML/JavaScript
Click on the title column section and write the text with "Spotify
In the content column, fill in the music URL from Spotify. See example
Click .
Add Button iframe SoundCloud
Login to your Blogger dashboard.
Go the Settings Layout.
Click Link Widget > Add Widget > type HTML/JavaScript
Click on the title column section and write the text with "SoundCloud
In the content column, fill in the music URL embed from SoundCloud. See example
Click .
Add Button FAQ
Login to your Blogger dashboard.
Go the Settings Layout.
Click Link Widget > Add Widget > type Text
Fill the title column with a question sentence.
Fill in the content column with the answer to the question.
Click .
Add Product Item
Log in to your Blogger dashboard.
Go to Posts.
Click + New Post and add a title for your product post.
Enter a category name in the Labels field.
Switch the post editor to HTML view.
Use the Product Post Generator below to create your product content.
Click Publish to publish your product post.